
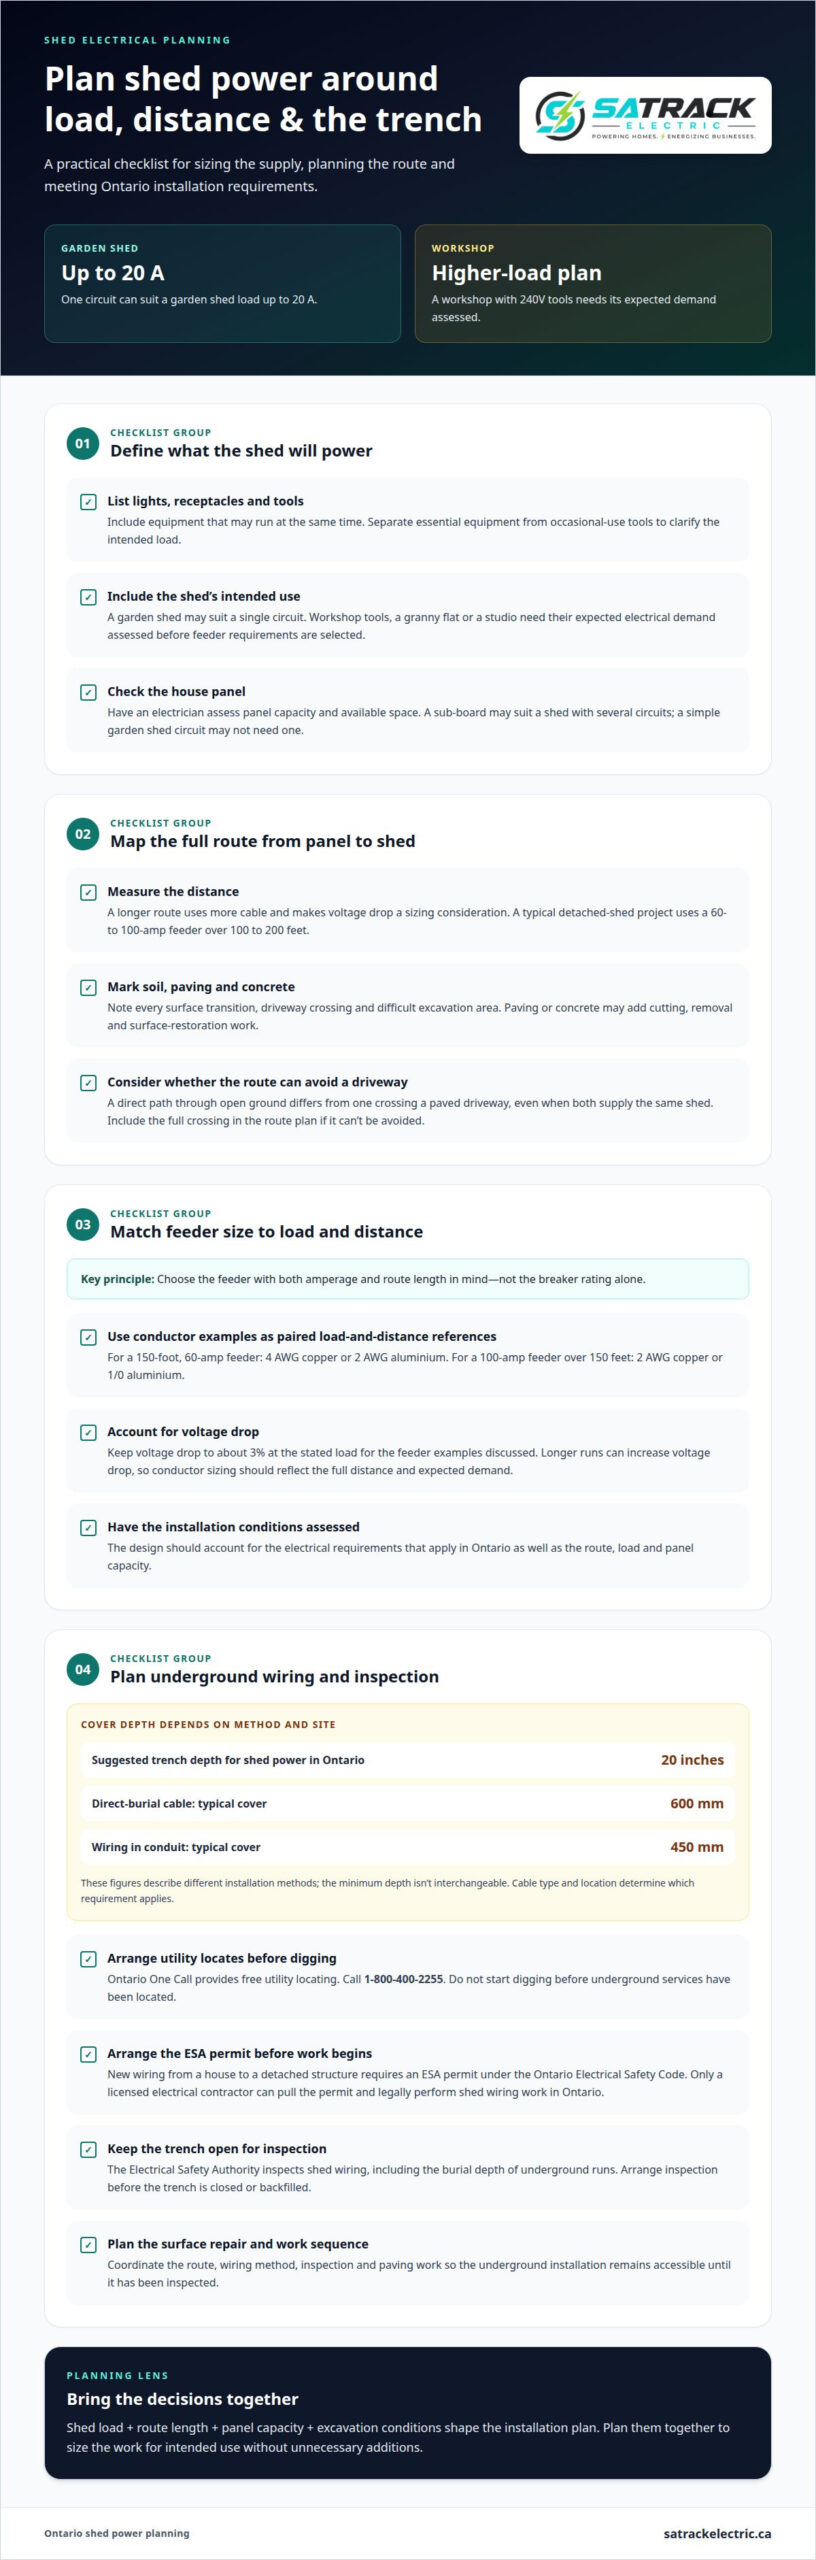
A sub-board isn’t automatically needed for every shed. One circuit can suit a garden shed load up to 20 A, while a workshop with 240V tools needs a higher-load plan. In Ontario, new wiring from a house to a detached structure requires an ESA permit. The cost to run power to a shed in Trenton depends on the distance, electrical load, panel capacity and whether the route involves paving or concrete.
It’s reasonable to want a clear estimate before work begins, especially when underground wiring could affect a driveway or walkway. This guide explains how to assess a shed’s power needs, whether a sub-board may be appropriate, and the main factors that affect the cost to run power to a shed in Trenton. It also covers underground routing, paving considerations and Ontario ESA requirements, so you can plan the work safely and realistically.
Key Takeaways
- List the shed’s planned lights, outlets and tools first; the expected load helps determine whether a single circuit or a feeder to a sub-board is appropriate.
- Map the route from the house to the shed, including its length and any paving or concrete, because these details affect cable sizing and installation work.
- Plan underground wiring around the cable or conduit method, and arrange the required inspection before the trench is closed.
- Account for Ontario ESA permit requirements and utility locating before digging; overhead and underground wiring are both possible when installed to the applicable requirements.
- Keep costs in check by planning the route and shed loads together, so the installation is sized for intended use without adding unnecessary work.
Estimating shed electrical load and feeder amperage
Distance, soil conditions, driveway crossings and the shed’s electrical needs all affect installation cost. Longer routes require more cable and trenching, while difficult excavation or paving repairs add work. Higher electrical loads may require a larger feeder or a sub-board.
Trenching through paving or concrete
Plan the trench route before excavation. In Ontario, cable type, conduit and location affect the required cover depth. Paving crossings can also add excavation and surface-restoration work.
- Map the route and identify surfaces. Mark the path from the house to the shed, noting lawn, soil, paving and concrete sections. A route that avoids a driveway may reduce cutting and reinstatement work. For a crossing that can’t be avoided, include its full length in the route plan. A 50-metre run, for example, needs more cable and trenching than a 10-metre run.
- Plan depth around the wiring method. A suggested trench depth for shed power in Ontario is 20 inches. Direct-burial cable typically requires 600 mm of cover, while wiring in conduit typically requires 450 mm, depending on cable type and location. These figures describe different installation methods, so the minimum depth isn’t interchangeable. The cable and site conditions determine which requirement applies.
- Account for soil and hard surfaces. Soil that is difficult to excavate can make trenching more involved than a clear lawn route. Paving and concrete may require cutting or removal before the trench can be made, followed by surface repair after backfilling. Record each surface transition along the route. This gives the electrical plan a clearer picture of access, excavation and restoration work.
- Coordinate the trench and cable installation. The electrical route needs to be established before the trench is closed. The installer places the approved wiring method along the planned path, maintains the required cover and prepares the work for inspection. Keep the trench accessible until the Electrical Safety Authority has inspected it. Closing it early can hide the underground installation from view.
- Arrange ESA inspection before backfilling. In Ontario, the trench should be inspected by ESA before it is closed. The Electrical Safety Authority inspects shed wiring, including the burial depth of underground runs. Plan the inspection around excavation and paving work so the trench remains open. For a project that includes a shed supply or another electrical installation, electrical installation planning can account for the route, method and inspection sequence.
Does Running Power to a Shed Require an ESA Permit in Ontario?
Yes. In Ontario, new wiring from a house to a detached structure requires an ESA permit under the Ontario Electrical Safety Code. The Code allows overhead or underground wiring, subject to requirements for the chosen method.
-
Arrange Permits and Utility Locating
Arrange the ESA permit and utility locates before excavation or electrical work begins. Only a licensed electrical contractor can pull the ESA permit and legally perform shed wiring work in Ontario. Ontario One Call provides free utility locating, and its telephone number is 1-800-400-2255. Do not start digging before underground services have been located. If digging damages a utility without proper locates, the person who dug is responsible for repair costs.
-
Meet Shed Wiring Requirements
Have a licensed electrical contractor plan the shed wiring under the Ontario Electrical Safety Code. The supply can run overhead or underground, but each method has installation requirements. The electrical plan should account for the shed’s intended circuits and how the wiring connects to the house. The permit covers new wiring between the house and detached structure, so include the complete supply route in the work plan.
- Schedule the electrical inspection at the right stage. The Electrical Safety Authority inspects shed wiring, including underground runs. Coordinate the inspection with the installation sequence so the work is accessible for review. For buried wiring, leave the trench open for inspection before closing it. This lets the inspector assess the underground installation before backfilling conceals it.
- Coordinate any building inspection separately. A municipal construction inspection relates to the building permit, not the ESA electrical permit. Quinte West requires at least two business days’ notice to book a building inspection. Confirm which inspection applies to each part of the project, then schedule them around the shed construction and electrical work. Keeping the inspections distinct helps prevent a building inspection from being mistaken for the ESA inspection.
Underground conduit and cable installation
Choose the underground wiring method before trenching begins. Cable type, conductor size, route length and surface conditions all shape the installation plan.
-
Compare Burial and Conduit Methods
Decide whether the design uses direct-burial cable or conductors installed in conduit. Direct-burial cable is designed for underground installation, while conduit provides a raceway for conductors. The methods have different installation requirements, so they are not interchangeable. Match the method to the route, site conditions and electrical design, including any driveway crossing or paved section.
- Plan conductor sizing for the full run. Select cable and conductors based on the shed’s planned electrical load and the distance from the house. A longer run makes voltage drop a factor in sizing; a 40 m shed supply run is one example where it must be considered. The feeder must suit the expected load, not just the lights or outlets installed first. Include planned tools and future use in the load assessment.
-
Estimate Underground Installation Cost
There is no single per-metre price for underground trenching and cable installation in Trenton. The price depends on the project and is provided after a quote request. Route length, soil, paving, cable type, conductor size and installation method all affect the work. A short, clear route differs from a longer run crossing concrete. Include excavation and surface restoration when assessing the complete installation.
- Include conduit size and quantity in the material plan. Rigid metal conduit is sold in different sizes, including ½-inch, ¾-inch and 1-inch. The selected size must suit the conductors and installation design. Measure the route and account for bends, transitions and connection points before calculating how much conduit is needed. A longer route requires more material, while a driveway crossing can add preparation and restoration work.
- Coordinate installation and inspection. Settle the cable route, conduit method and conductor selection before installation begins. Keep the underground work accessible for the required inspection before closing the trench. For example, a route that runs through open ground and then crosses paving needs a plan for both sections. This helps coordinate excavation, wiring, inspection and surface restoration in the right order.
Ways to reduce shed power installation costs
Avoid unnecessary work by deciding how the shed will be used, planning its electrical layout and choosing a cable route before installation. The cost to run power to a shed in Trenton depends on these project choices, not just the distance from the house.
- Define the shed’s intended use. List the lights, receptacles and equipment the shed will need, including tools that may run together. A simple storage shed differs greatly from a workshop or dedicated workspace; when creating specialized outbuildings, bespoke builders like Mighty Oak Construction often map out power and equipment requirements during the initial design phase. A clear load plan helps size the supply for actual use and avoids paying for a design based on guesswork or adding circuits after installation.
- Choose the shed location with the route in mind. Consider how the position affects cable distance, excavation and access. A route across open ground may involve less surface work than one crossing a driveway or concrete path. Review the route before finalizing shed placement, and consider whether a practical alternative avoids an obstacle without making the supply unsuitable.
- Keep the route direct where practical. A direct path can reduce the amount of cable and trenching required. Mark the proposed route from the house to the shed, then note corners, surface changes and access constraints. Avoid adding unnecessary bends or detours. The electrical design still needs to account for the load and voltage drop, so shortening the route must not compromise the installation.
- Coordinate excavation with surface restoration. Identify each paved or concrete section before work starts. A planned crossing lets the installation account for cutting, trenching and restoring the affected surface in sequence. Where the route can avoid a paved area, that may reduce extra site work. Keep underground wiring accessible for the required ESA inspection before the trench is closed.
- Plan the right supply instead of overbuilding. A single circuit may suit a garden shed load up to 20 A; a larger workshop may need a different arrangement. Decide whether the shed needs a sub-board based on its circuits and intended equipment. An oversized design adds materials and work, while an undersized supply can lead to costly changes when use expands.
- Coordinate related electrical work. If the house panel needs attention, include that assessment in the project plan rather than treating it as an unrelated later task. Panel capacity, available space and shed load all affect the supply design. Combining planning steps can help avoid repeated site work, but the electrical installation must still follow Ontario requirements and pass the required inspection.
- Settle the plan before installation. Confirm the shed layout, equipment list and preferred route before work begins. Changes after trenching can mean revising cable needs or disturbing completed surfaces. Plan your shed electrical installation around the load, route and inspection sequence to limit avoidable revisions.
Satrack Electric
Satrack Electric helps homeowners plan shed electrical installations around the shed’s intended use, supply route and existing panel. Its residential electrical services can address load requirements, panel capacity and the wiring approach before work proceeds. This is useful when you’re deciding whether a shed needs a dedicated circuit or a more substantial supply. As a licensed electrical contractor in Ontario, Satrack Electric can carry out electrical installation work and help align the plan with applicable requirements. Share the shed’s planned equipment, location and preferred route to support a clear discussion of the project. Contact Satrack Electric to discuss your shed power plans.
Plan your shed’s next step
Before scheduling work, prepare a practical project brief: note what the shed will power, where it is located and how the proposed route reaches the house. This gives the electrical plan a clear starting point and helps prevent late layout changes. To estimate the cost to run power to a shed in Trenton, request a quote. The price depends on the project, with route length, ground conditions, driveway crossings and power needs affecting the work.
Satrack Electric provides residential and commercial electrical services, including electrical repairs and installations. When you’re ready to move from planning to an assessed electrical installation, share your shed’s intended use and proposed location with Satrack Electric to start a focused project discussion.
Contact Satrack Electric about shed power and take the next step towards a shed supply planned for its intended use.
Frequently Asked Questions
Do I need a sub-board in the shed?
Not necessarily. The decision depends on the shed’s load and the number of circuits it needs. A shed with one modest circuit may not need a separate sub-board, while a workspace with equipment on separate circuits may benefit from one. List planned tools and lighting separately, then consider whether they may operate at the same time. The feeder design also needs to suit the house panel and the shed’s intended use.
Does the cable have to go underground?
No. Ontario’s Electrical Safety Code permits both overhead and underground wiring to a detached structure, subject to requirements for the chosen method. The practical choice depends on the route, obstructions and site layout. For example, an open route may make overhead wiring feasible, while trees, buildings or a paved path can affect the preferred arrangement. Include the chosen method in the electrical plan and install it to applicable requirements.
How long does it take?
Running power to a shed can take 1-2 days. The work sequence depends on the route and installation tasks, including excavation, wiring, inspection and any surface restoration. A straightforward route through accessible ground differs from one crossing concrete or requiring extensive trenching. Planning the route and shed layout before work starts helps coordinate those stages and avoid delays caused by changing the installation plan midway through the project.
One circuit or a sub-board?
Choose a single circuit for a modest load that can operate within its capacity; consider a sub-board when the shed needs multiple circuits or a more flexible distribution setup. A garden shed load up to 20 A is an example suitable for one circuit. A workshop with tools and separate lighting needs a different assessment. The key distinction is the expected load and circuit arrangement, not simply the shed’s size.
What Size Wire for My Distance?
Wire size depends on the feeder distance and the shed’s electrical load. A longer run can increase voltage drop, while higher demand affects the conductor capacity required. A supply for a shed used only for lights differs from one powering workshop equipment. The electrician sizes the conductors for the actual route and expected load, then selects a suitable wiring method for the site.
What is the average cost to run electricity to a shed in Trenton, Ontario?
The cost to run power to a shed in Trenton depends on the project; a price is provided after a quote request. Key factors include the distance from the house, the shed’s power needs, the wiring method, ground conditions and any driveway or concrete crossing. A useful estimate accounts for the complete route and installation work, not just the cable length.
What does it cost to install an overhead power line to a shed in Ontario?
The price depends on the project and is provided after a quote request. The route, electrical load, connection points and site obstacles affect the work involved. An overhead path with clear access differs from one that must navigate trees or structures. The electrical design must also meet the requirements for overhead wiring. These details shape the estimate without relying on a generic per-metre figure.
How much do electrician labour, materials, and permits add to a shed electrical hookup in Trenton?
Labour, materials and permit-related requirements depend on the project scope and are assessed as part of the quote. Labour reflects the route and installation tasks; materials depend on conductor, conduit and equipment choices. An ESA permit is required for new wiring from a house to a detached structure in Ontario. A clear project brief helps account for these components together rather than treating them as unrelated add-ons.